Implement Real-time Filtering With CIFilter
In my previous article, I talked about creating a custom filter with CIFilter. In this article, I will talk about how to use CIFilter filters for real-time filtering. Camera usage and camera usage permission are required for the application to work. Make sure you ask for the Privacy — Camera Usage Description permission in Info.plist.
First, let’s create a class called CameraCapture to process and transfer the images captured by the camera. This class is initialized with a camera position and a callback closure.
typealias Callback = (CIImage?) -> ()
private let position: AVCaptureDevice.Position
private let callback: Callback
init(position: AVCaptureDevice.Position = .front, callback: @escaping Callback) {
  self.position = position
  self.callback = callback
  super.init()
}
Define an AVCaptureSession and a user-initiated DispatchQueue in the class. It’s important to define userInitiated, as it will always appear in the UI.
private let session = AVCaptureSession()
private let bufferQueue = DispatchQueue(label: "someLabel", qos: .userInitiated)
Write two public functions to start and end the session since the session is private.
func start() {
  session.startRunning()
}
func stop() {
session.stopRunning()
}Create a function for session configuration and call it after super.init(). To process the images captured by the camera, CameraCapture must conform to the AVCaptureVideoDataOutputSampleBufferDelegate protocol.
private func configureSession() {
// 1
session.sessionPreset = .hd1280x720
// 2
let discovery = AVCaptureDevice.DiscoverySession(deviceTypes: [.builtInDualCamera, .builtInWideAngleCamera], mediaType: .video, position: position)
guard let camera = discovery.devices.first, let input = try? AVCaptureDeviceInput(device: camera) else {
// Error handling
return
}
session.addInput(input)
// 3
let output = AVCaptureVideoDataOutput()
output.setSampleBufferDelegate(self, queue: bufferQueue)
session.addOutput(output)
}Let’s take a step-by-step look at what’s inside the function.
1. Determining the image quality.
2. Finding and configuring suitable video-capturing elements with AVCaptureDevice.DiscoverySession and creating capture input with AVCaptureDeviceInput
3. Create the output with AVCaptureVideoDataOutput and add the delegate to the class
The captured image needs to be converted to CIImage and fed into the callback closure. Write an extension for CameraCapture that conforms AVCaptureVideoDataOutputSampleBufferDelegate for this.
extension CameraCapture:AVCaptureVideoDataOutputSampleBufferDelegate {
func captureOutput(_ output: AVCaptureOutput, didOutput sampleBuffer: CMSampleBuffer, from connection: AVCaptureConnection) {
guard let imageBuffer = CMSampleBufferGetImageBuffer(sampleBuffer) else { return }
DispatchQueue.main.async {
let image = CIImage(cvImageBuffer: imageBuffer)
self.callback(image.transformed(by: CGAffineTransform(rotationAngle: 3 * .pi / 2)))
}
}
}Create a CIImage with the sampleBuffer from the delegate function and pass it to the callback. Since the incoming image is sideways, it is necessary to rotate it 270 degrees. As a result, the following class is created.
cameraCapture.swift
import AVFoundation
import CoreImage
class CameraCapture: NSObject {
typealias Callback = (CIImage?) -> ()
private let position: AVCaptureDevice.Position
private let callback: Callback
private let session = AVCaptureSession()
private let bufferQueue = DispatchQueue(label: "someLabel", qos: .userInitiated)
init(position: AVCaptureDevice.Position = .front, callback: @escaping Callback) {
self.position = position
self.callback = callback
super.init()
configureSession()
}
func start() {
session.startRunning()
}
func stop() {
  session.stopRunning()
}
private func configureSession() {
session.sessionPreset = .hd1280x720
let discovery = AVCaptureDevice.DiscoverySession(deviceTypes: [.builtInDualCamera, .builtInWideAngleCamera], mediaType: .video, position: position)
guard let camera = discovery.devices.first, let input = try? AVCaptureDeviceInput(device: camera) else {
// Error handling
return
}
session.addInput(input)
let output = AVCaptureVideoDataOutput()
output.setSampleBufferDelegate(self, queue: bufferQueue)
session.addOutput(output)
}
}
extension CameraCapture: AVCaptureVideoDataOutputSampleBufferDelegate {
func captureOutput(_ output: AVCaptureOutput, didOutput sampleBuffer: CMSampleBuffer, from connection: AVCaptureConnection) {
guard let imageBuffer = CMSampleBufferGetImageBuffer(sampleBuffer) else { return }
DispatchQueue.main.async {
let image = CIImage(cvImageBuffer: imageBuffer)
self.callback(image.transformed(by: CGAffineTransform(rotationAngle: 3 * .pi / 2)))
}
}
}After creating the CameraCapture class without any problems, filtering can be performed using this class. Create a ViewController with UIImageView and CameraCapture instances.
class RealtimeFilterViewController: UIViewController {
  var imageView: UIImageView!
  var cameraCapture: CICameraCapture?
  override func viewDidLoad() {
    super.viewDidLoad()
    imageView = UIImageView(frame: view.bounds)
    view.addSubview(imageView)
    cameraCapture = CICameraCapture(cameraPosition: .front, callback: { image in })
    cameraCapture?.start()
  }
}
Now it’s time to filter and show the image from the callback. Select and apply any built-in filter. Let’s choose the xRay filter. Do the filtering inside the callback closure. Finally, cameraCapture looks like this:
cameraCapture = CICameraCapture(cameraPosition: .front, callback: { image in
  guard let image = image else { return }
  let filter = CIFilter.xRay()
  filter.setDefaults()
  filter.inputImage = image
  let uiImage = UIImage(ciImage: (filter.outputImage!.cropped(to: image.extent)))
  self.imageView.image = uiImage
})
Let’s run it this way. But what’s that? Nothing appears, and a message is constantly logged to the console.
2022-11-08 15:06:14.829234+0300 RealtimeFiltering[2903:883376] [api] -[CIContext(CIRenderDestination) _startTaskToRender:toDestination:forPrepareRender:forClear:error:] The image extent and destination extent do not intersect.The message is pretty clear. The image extent and destination extent do not intersect. We should define a function to transform and scale the image into the bounds of our view. Create an extension and use this function:
import CoreImage
extension CIImage {
  func transformToOrigin(withSize size: CGSize) -> CIImage {
    let originX = extent.origin.x
    let originY = extent.origin.y
    let scaleX = size.width / extent.width
    let scaleY = size.height / extent.height
    let scale = max(scaleX, scaleY)
    return transformed(by: CGAffineTransform(translationX: -originX, y: -originY)).transformed(by: CGAffineTransform(scaleX: scale, y: scale))
  }
}
Now, let’s use this function to define the uiImage, and bam! We have created a working real-time filtering application.
let uiImage = UIImage(ciImage: (filter.outputImage!.cropped(to: image.extent).transformToOrigin(withSize: self.view.bounds.size)))Finally, RealtimeFilterViewController should look like this:
realtimeViewController.swift
import UIKit
import CoreImage
import CoreImage.CIFilterBuiltins

class RealtimeFilterViewController: UIViewController {
    var imageView: UIImageView!
    var cameraCapture: CameraCapture?

    override func viewDidLoad() {
        super.viewDidLoad()
        imageView = UIImageView(frame: view.bounds)
        view.addSubview(imageView)

        cameraCapture = CameraCapture(callback: { image in
            guard let image = image else { return }
            let filter = CIFilter.xRay()
            filter.setDefaults()
            filter.inputImage = image
            let uiImage = UIImage(ciImage: (filter.outputImage!.cropped(to: image.extent).transformToOrigin(withSize: self.view.bounds.size)))
            self.imageView.image = uiImage
        })

        cameraCapture?.start()
    }
}
It works perfectly for one simple filter. The output image looks like this:
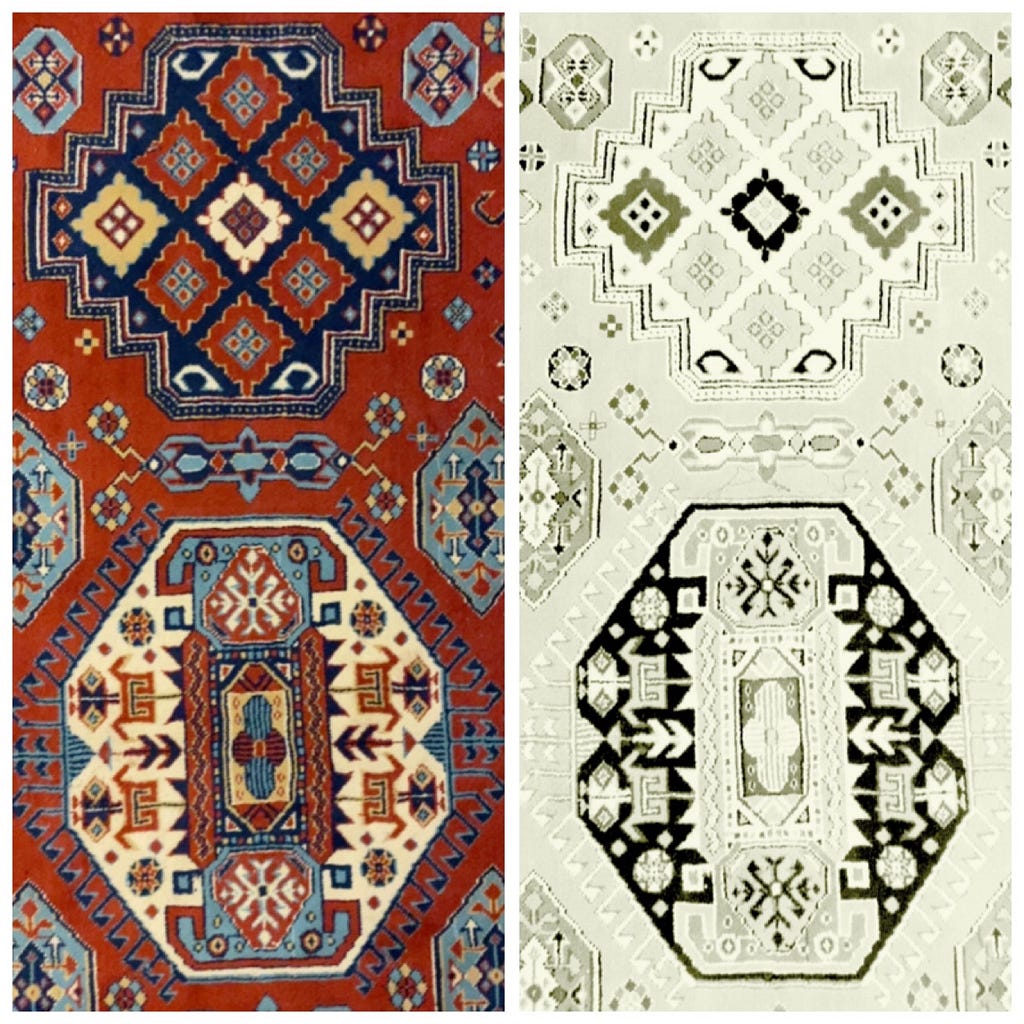
But what if several filters are used as a chain? Let’s try it. Change the cameraCapture definition like this:
cameraCapture = CICameraCapture(cameraPosition: .front, callback: { image in
  guard let image = image else { return }
  let filter = CIFilter.thermal()
  let filter2 = CIFilter.xRay()
  let filter3 = CIFilter.motionBlur()
  filter.setDefaults()
  filter2.setDefaults()
  filter3.setDefaults()
  filter.inputImage = image
  filter2.inputImage = filter.outputImage!
  filter3.inputImage = filter2.outputImage!
  let uiImage = UIImage(ciImage: (filter3.outputImage!.cropped(to: image.extent).transformToOrigin(withSize: self.view.bounds.size)))
  self.imageView.image = uiImage
})
It still works, but when looking at the resource consumption, it looks like it’s literally draining.
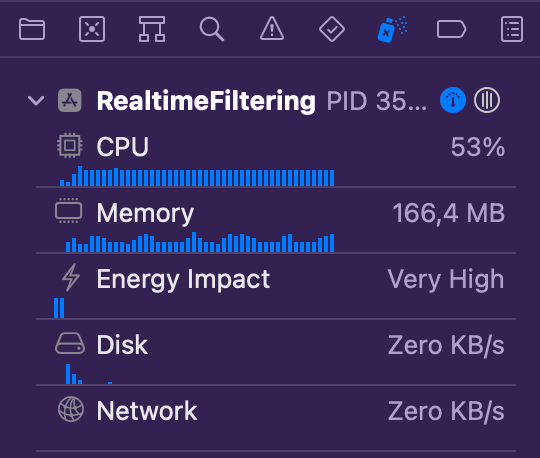
This way is not efficient at all. So, what to do? Fortunately, Apple is aware of this and has provided a more efficient way. It’s MTKView. Create a class named MetalRenderView that inherits MTKView.
MetalRenderView.swift
import MetalKit
import CoreImage

class MetalRenderView: MTKView {
    private lazy var commandQueue: MTLCommandQueue? = {
        return device?.makeCommandQueue()
    }()

    private lazy var ciContext: CIContext? = {
        guard let device = device else { return nil }
        return CIContext(mtlDevice: device)
    }()

    private var image: CIImage? {
        didSet {
            renderImage()
        }
    }

    override init(frame frameRect: CGRect, device: MTLDevice?) {
        super.init(frame: frameRect, device: device)

        if super.device == nil {
            fatalError("Metal is not supported by this device")
        }
        framebufferOnly = false
    }

    required init(coder: NSCoder) {
        fatalError("init(coder:) has not been implemented")
    }

    func setImage(_ image: CIImage?) {
        guard let image = image else { return }
        self.image = image
    }

    private func renderImage() {
        guard let image = image,
              let currentDrawable = currentDrawable,
              let ciContext = ciContext else { return }

        let commandBuffer = commandQueue?.makeCommandBuffer()
        let destination = CIRenderDestination(width: Int(drawableSize.width),
                                              height: Int(drawableSize.height),
                                              pixelFormat: .rgba8Unorm,
                                              commandBuffer: commandBuffer) { () -> MTLTexture in
            return currentDrawable.texture
        }

        do {
            try ciContext.startTask(toRender: image.transformToOrigin(withSize: drawableSize), to: destination)
        } catch {
            // Error handling
        }

        commandBuffer?.present(currentDrawable)
        commandBuffer?.commit()
        draw()
    }
}
The application will crash if the device does not support the Metal framework. The most important part of MetalRenderView is the renderImage function. This function is called when the image is assigned and makes the image suitable for MTKView. For more information, Apple’s document for MTKView can be used.
Now, let’s show the filtered image with the help of this MetalRenderView. First, let’s replace the imageView in the RealtimeFilterViewController with MetalRenderView.
var metalView: MetalRenderView!Secondly, replace the following block in viewDidLoad:
imageView = UIImageView(frame: view.bounds)
view.addSubview(imageView)
…with this
metalView = MetalRenderView(frame: view.bounds, device: MTLCreateSystemDefaultDevice())
view.addSubview(metalView)
Then replace these two lines inside the callback closure
let uiImage = UIImage(ciImage: (filter3.outputImage!.cropped(to: image.extent).transformToOrigin(withSize: self.view.bounds.size)))
self.imageView.image = uiImage
with this
self.metalView.setImage(filter3.outputImage?.cropped(to: image.extent))MetalRenderView handles transformToOrigin method on its own. Now, RealtimeFilterViewController should look like this:
RealtimeFilterWithMetalViewController.swift
import UIKit
import CoreImage
import CoreImage.CIFilterBuiltins

class RealtimeFilterWithMetalViewController: UIViewController {
    var metalView: MetalRenderView!
    var cameraCapture: CameraCapture?

    override func viewDidLoad() {
        super.viewDidLoad()
        metalView = MetalRenderView(frame: view.bounds, device: MTLCreateSystemDefaultDevice())
        view.addSubview(metalView)

        cameraCapture = CICameraCapture(cameraPosition: .front, callback: { image in
            guard let image = image else { return }
            let filter = CIFilter.thermal()
            let filter2 = CIFilter.xRay()
            let filter3 = CIFilter.motionBlur()
            filter.setDefaults()
            filter2.setDefaults()
            filter3.setDefaults()
            filter.inputImage = image
            filter2.inputImage = filter.outputImage!
            filter3.inputImage = filter2.outputImage!
            self.metalView.setImage(filter3.outputImage?.cropped(to: image.extent))
        })

        cameraCapture?.start()
    }
}
Now, let’s run the application again and see the difference. It looks slightly better. But the slight difference will be more valuable when the number of filters increases or when working with more difficult filters.
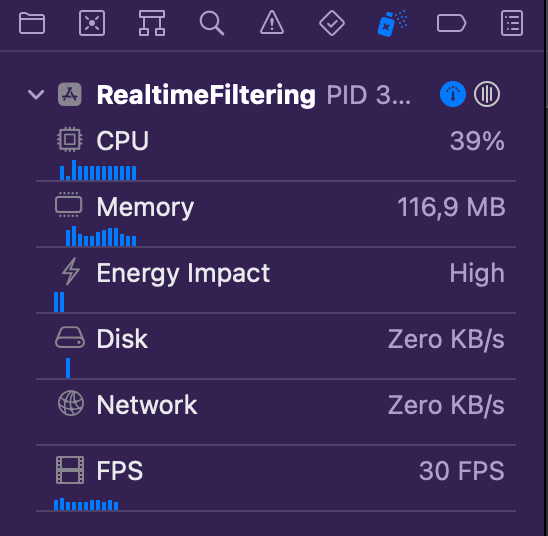
Yes, we now have a fully working and more efficient real-time filtering application. The application can be developed with different filters and different UI enhancements. The app may be able to take pictures, but that’s a topic for another article.
Originally published in Better Programming on Medium.